
Does your Galvo, Primo, Symo or Eco solar inverter require a Fronius USB update? If your inverter hasn’t been updated for a while it’s not a bad idea to run a firmware update via USB.
Why Fronius USB Update?
 There are a number of different reasons that you would perform a Fronius USB update as follows:
- Rectify issues with bugs in the existing firmware (not bugs of the creepy crawly kind mind you – we’re talking glitches in the inverter firmware)
- Improved inverter performance
- Improved inverter safety
- Amendments and improvements to the existing firmware
As can be seen all these points are going to be beneficial to you, so why not watch the following video and see how to perform a Fronius USB update on a Galvo, Primo, Symo or Eco Fronius solar inverter? It’s not too difficult to do yourself if you follow the instructions on the video.
Fronius USB Update Steps
Please complete the following steps in order:
At your computer:
- First off you need a large flat head screwdriver, a USB stick and a computer connected to the internet to download the firmware update.
- On your computer visit fronius.com
- In the top right hand corner click on Download Search
- In the search panel type in USB update
- The results will pop up, click on SOLAR ENERGY
- On the left hand side select your country as a filter
- Click on the appropriate firmware download for your model of Fronius inverter
- Open USB folder and delete any files / folders that may be present
- Copy latest Fronius USB Firmware to USB stick
- Eject USB stick from computer and go to inverter
At your inverter:
- Undo screws holding lower gray cover onto inverter
- Remove cover
- Insert USB into inverter USB slot
- Go to Settings Menu
- Go to USB
- Go to Software Update
- Press Enter a couple of times on the screens showing firmware changes
- The inverter will copy the files, update and restart
- When the inverter had restarted go back to Settings
- Go to USB
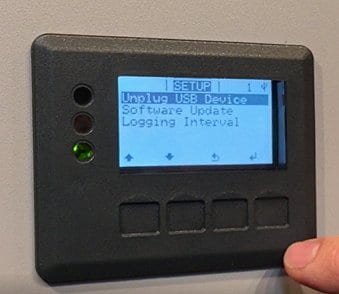
- Go to Unplug USB Device
- When the screen shows OK remove the USB stick
- Close the inverter cover back up and reinsert the screws and you’re away!
Congratulations, you successfully updated the firmware on your Fronius solar inverter! Now you can rest assured your solar inverter is up to date and performing at it’s best, and if you had to update your inverter due to a STATE code or an error with your system hopefully the latest firmware update has sorted that out for you.
As discussed we do highly recommend that you check the Fronius site for USB updates every year or so to ensure your solar inverter is kept up to date.
If you are still having an issue with a STATE code or error on your Fronius solar inverter click on one of the following links to see what the STATE code is telling you:
- Click here for Fronius IG inverter State Codes
- Click here for Fronius Galvo State Codes
- Click here for Fronius Primo State Codes
- Click here for Fronius SYMO State Codes